

How To Install Vinyl Runner On Carpeted Stairs
How to Install Vinyl Siding
Updated: May 06, 2022
Become professional person-looking, watertight results with these residing techniques.
Don't be intimated by vinyl siding. We'll show you how to install information technology and brand repairs. Y'all can salvage a lot of money by handling a vinyl siding project yourself. And yous'll still get professional person looking results. In this commodity, nosotros'll bear witness you everything you lot need to know to remove and install vinyl siding so information technology's watertight and looks great.
Yous might besides like: TBD
- Time
- Complexity
- Cost
- A total day
- Intermediate
- Varies
Working with vinyl siding
Working with vinyl siding
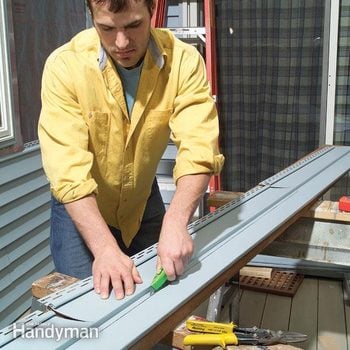
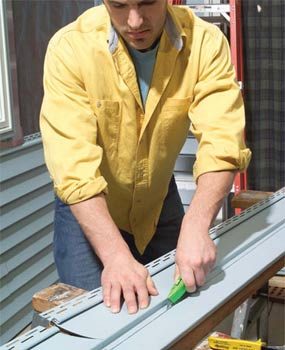
Yous'll need specialty tools, like this nix tool, to work with installing vinyl siding.
Don't permit the fact that you lot take vinyl siding installation deter yous from that repair or remodeling project. If you lot want to shift a window, supercede a door or fifty-fifty put on an improver, y'all tin can remove, modify and reinstall vinyl siding much more easily than any other blazon of siding. In this article, we're going to demonstrate how to rework the siding around a new fix of windows.
We'll testify you how to remove information technology, and learn tips for installing vinyl siding new parts. We'll as well show you how to cut vinyl siding, fit it and blast it back up. Most of import, nosotros'll testify you how to brand the installation watertight.
While nosotros'll comprehend the basics, we won't embrace every particular you lot might encounter with your ain projection. Near manufacturers offer complete instructions; inquire for them wherever vinyl siding is sold.
Working with vinyl doesn't require special skills, but y'all do have to understand the arrangement. The only special tool you'll need for reworking areas is an unlocking tool, oftentimes called a zip tool. (You'll demand a snap-lock punch if you intend to comprehend new areas.) You'll probably need new vinyl siding trim pieces. We bought two types-J-aqueduct to go effectually the new, larger windows (Photo 9), and undersill trim (meet "When to Install Undersill Trim."). You lot may too need additional siding.
Best Way to Cut Vinyl Siding and Installation
Vinyl siding installation is designed to hang loosely on the sheathing so that it can expand and contract with temperature changes. To prevent the relatively thin panels from buckling, observe these plumbing equipment and nailing rules.
- Get out a 1/4-in. gap at all ends. The siding slides behind vinyl siding trim pieces that hide the gap and the cut finish.
- Lock the console into the one below information technology, then gently snug it upwardly before nailing. Marking the position of each piece before you remove it (Photo 2) volition help you reposition the siding without stretching it.
- Center the nails in the nailing slots and drive them, leaving 1/xvi in. to one/8 in. of the shank exposed (Photo xiv). The vinyl must be free to expand and contract.
Remove the siding

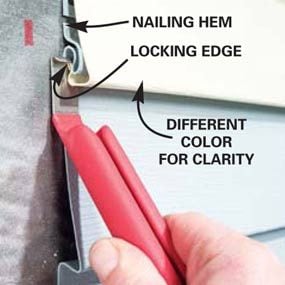
Detail of a zip tool
You'll demand a zip tool to remove siding.
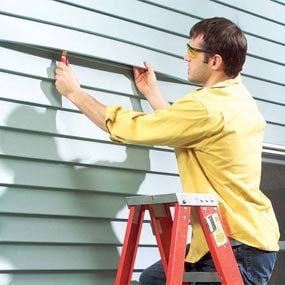
Photo 1: Unlock siding using a naught tool
Slide the zippo tool under the butt border of the siding, hook the locking edge and pull down. And then slide the tool horizontally along the lock to release information technology. Lift the unlocked siding to expose the nailing hem of the siding piece below. Draw a line on the wall along the top of each siding grade before you pull the nails.
Detail photo of the zip tool in use
The zip tool slides under the siding to unlock it
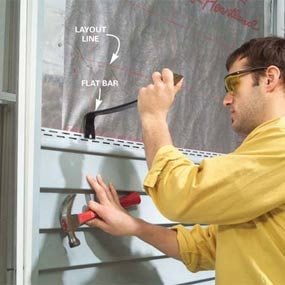
Photo ii: Pull out the nails
Drive a flat bar between the nailheads and siding and advisedly pull the nails. Then slide the slice down to unlock and remove it. Number each piece and set it aside. Remove siding until you expose enough wall to replace the window.
The beauty of vinyl is that you tin remove a piece anywhere on the wall. Locate the piece you want to remove and unlock the one to a higher place information technology with the zero tool (Photograph 1 inset). Information technology might be tricky hooking the zip tool onto the locking edge if your siding is tight. Try starting at an end or await for a loose spot. Sometimes you can unzip it just with your fingers. If you're having difficulty with a particular lock, try moving upwards a course. New vinyl siding is quite flexible, especially in warm weather, but older siding becomes more brittle with age, and then work carefully.
It should be easy to slide a flat bar behind the nailheads since they're not driven tight (Photo two). Don't slide the flat bar behind the siding itself. You'll chance breaking it. Yous may have to bow each length of vinyl to release its ends from the trim moldings, and yous may accept to slide short pieces up or down past the window to release them from the J-channel.
Building newspaper and window flashing

Photo 3: Install the flashing nether the window
Level and tack the new window in place then cut a piece of aluminum flashing to width so it extends from the new window to overlap the nailing hem of the siding beneath. Slide the pinnacle edge under the window fin, then nail off the fin with roofing nails.
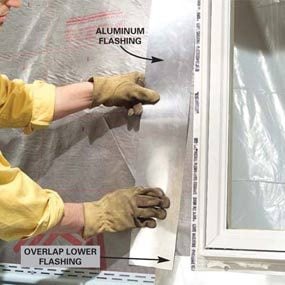
Photo iv: Install flashing adjacent to the window
Slide 5-in. wide vinyl siding flashing nether the window'due south nailing fin. Make certain it laps over the bottom flashing at least two in. and extends two in. to a higher place the window's top. Nail off the window.
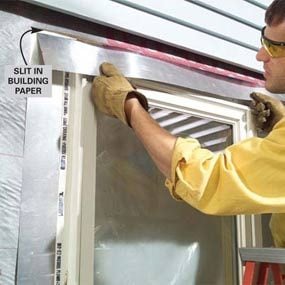
Photo 5: Identify building paper over the window
Slit the building paper about 2 in. to a higher place the window and slide five-in. wide flashing backside it. Lap it over the side flashing and window nailing fin. Drive roofing nails at each corner to secure it.
Building paper is an important function of the wall'south waterproofing. It'southward a barrier to any h2o that may work its style backside the siding, so be sure upper pieces lap over lower ones. Tape any tears or holes with housewrap record (available at home centers).
Flashing is critical for a watertight window or door. Aluminum works all-time with vinyl. Purchase a 10-in.wide roll of aluminum (at home centers), and cut information technology into 5-in.wide strips for the top and sides of the window. The width of the bottom flashing volition vary. It must go under the window nailing fin and lap over the nailing hem of the vinyl siding (Photo 3). This will straight water to the front of the siding.
When you're washed flashing the window, stand dorsum and imagine water running down the wall. Showtime higher up the window and visually check that all building papers and flashing lap over the piece below it and then water can't run behind.
Install J-channel effectually the window

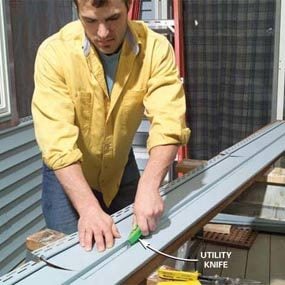
Photograph half-dozen: Notch the J-channel
Cutting a section of new J-channel 2 in. longer than the width of the window. Mark out a notch i in. in from each stop and deeply score the inner cutting line with a utility knife.
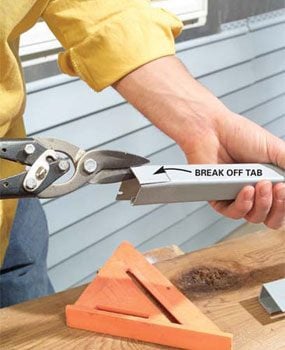
Photograph seven: Terminate the notches with tin snips
Make the final two cuts with snips. Curve the tab dorsum and forth to snap it off (run into Photograph viii).
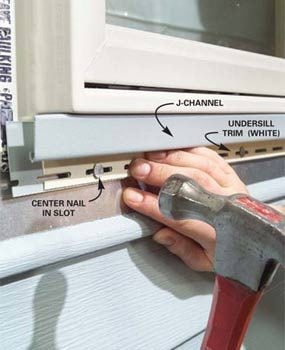
Photo eight: Install J-channel nether the window
Position the J-channel nether the window. Cutting and position an undersill trim if necessary (see 'When to Use Undersill Trim.'). Drive covering nails every 8 to 10 in. through the heart of the slots. Don't drive them tight. The vinyl siding trim pieces should slide back and forth slightly.
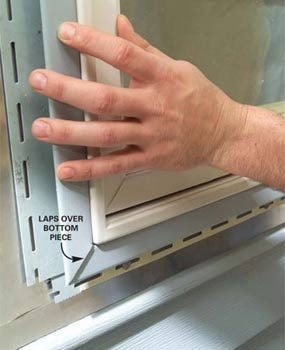
Photograph 9: Cutting J-aqueduct for the sides of the window.
Cut the side J-aqueduct ii in. longer than the height of the window. Make the miter cutting on the bottom with shears. Cut a ane-in. notch on the summit stop as you did on the bottom J-channel. Lap the side over the bottom equally shown. Drive roofing nails every eight to ten in. to secure it.
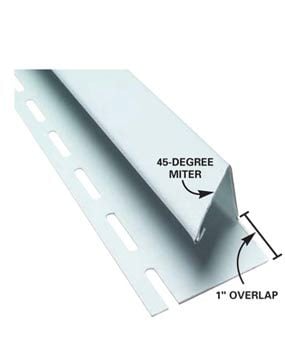
Side J-channel detail
Cut 45-caste miters in the side J-channel

Photo 10: Cut J-channel for the meridian of the window.
Cut the superlative J-channel 2 in. longer than the window width. Cut and curve the profile shown (run into detail) on both ends. Lap it over the sides every bit shown and nail it into place.

Peak J-channel detail
Cut and notch J-channel to fit over the superlative of the window.
You have to wrap the window with vinyl J-channel to divert water and to encompass the ends of the siding (Photo nine).Y'all'll probably have to buy new strips for this. Start with the lesser piece and work upward to the top (Photos 6 – ten). Make sure the pieces overlap to keep out water.
Mitered corners give a make clean and finished appearance. Be extra conscientious to fit the top aqueduct correctly over the side pieces (Photo 10) because a lot of water can run over these joints.
When to Use Undersill Trim
Because the siding is beveled, the cut edge under a window may cease up about 1/2 in. out from the wall. If it falls 1/four in. or less away, add the undersill trim to lock it in place (shown). If it falls more than than one/4 in. away, skip the undersill trim and but rely on the J-channel.
Tip:
If you're working over cream sheathing, place a piece of plywood between the foam and apartment bar to avert crushing the foam.
Install vinyl siding
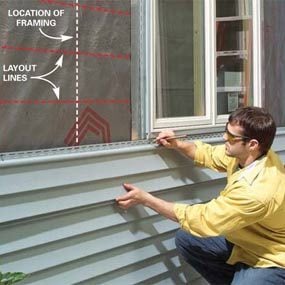
Photo 11: Mark the cuts for siding under the window
Position the siding to be notched below the window. Mark it on each side of the window, allowing an actress 1/4-in. gap on each side for expansion. Measure from the locking tab of the siding beneath to the undersill trim to make up one's mind the depth of the notch.
Photograph 12: Cutting the siding to fit under windows.
Cut through the nailing hem with shears, then score deeply forth the rip line with a utility knife. Bend dorsum the piece to snap off the notch.
Photograph 13: Install the notched siding
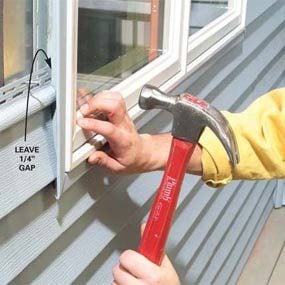
Position the notched piece under the window, sliding it into the undersill trim and pushing the barrel edge against the locking tab in the lower siding course to snap it in place. Make certain the top border is on the layout line, and then bulldoze covering nails at each stud.
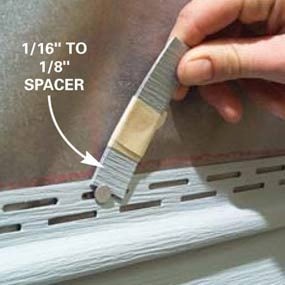
Photo xiv: Don't boom the siding tight against the wall
Drive nails so that the exposed shank equals the thickness of two layers of siding (1/16 in. to i/eight in.). Don't drive nails all the way in.

Photo xv: Install vinyl siding over the window
Mensurate and notch the top piece over the window. If necessary, put a butt joint above the window to make it easier to install these final pieces. Lock the piece to the one beneath it, then boom it into place.
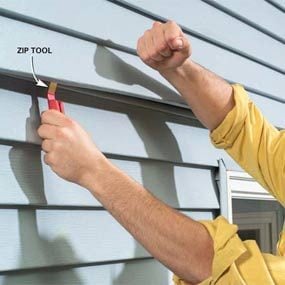
Photograph sixteen: Lock the siding together
Finally, pull the last loose slice downwardly and over the lock with the zip tool. Using your hand, push or pound the piece to lock information technology back into place. Work the slice into the lock down its length.
Maneuvering long pieces of vinyl into place can be catchy. Push 1 end of longer pieces into the trim, so bow the siding slightly and guide the other end into the trim.
Then slide it upwards and snap the butt into the locking edge of the piece below. Feed the shorter pieces alongside the window into the channel at the top of the window, and slide them down into position. Installing the piece above the window (Photo 15) was especially tricky considering it was too the final piece (it would have been easier to remove one more than class above).
We had to cut the piece and put a joint direct above the window. So nosotros cutting a long length of extra siding to complete the row. Be sure to overlap barrel joints 1 in. This method wouldn't work if you lot had to splice in new vinyl, because the colors wouldn't match.
Matching your siding
Remove a piece of siding and place it. Take it to a siding retailer or distributor. They'll place the brand and style and should be able to direct you to the correct source. Unfortunately, vinyl siding fades with age, so an exact color match may exist impossible.
Exist sure to relieve and reuse all the siding you remove. The vinyl siding trim pieces aren't as critical. If you have to add together new siding, position information technology in an obscure spot, like the base of a wall or behind the garage. In fact, you may want to re-side an unabridged wall with new vinyl.
Required Tools for this Project
Accept the necessary tools for this DIY projection lined upward earlier you start—y'all'll save fourth dimension and frustration.
Zip tool
Required Materials for this Project
Avoid terminal-minute shopping trips by having all your materials ready ahead of time. Hither's a list.
Originally Published: May 06, 2022

Source: https://www.familyhandyman.com/project/how-to-install-vinyl-siding/
Posted by: morristhopulares.blogspot.com
0 Response to "How To Install Vinyl Runner On Carpeted Stairs"
Post a Comment